Digital Music To Go (Part 2 of 2)
This is the second part of a 2-part post. Read the first part here.
The goals/limitations of this project:
-
Play digital music files (mp3/wma) through my car stereo
-
Create a clean, integrated solution (no messy wires)
-
No permanent modifications to the car
-
I had no game plan. Once I got home with the modulator, I had no idea how I would actually mount it. I had to resort to whatever items I could find around the house.
As mentioned in previous post, I decided to use a Dell DJ with an FM modulator to play digital music files through the car's speakers.
Parts list:
-
2000 Honda Prelude
-
Dell DJ Inline remote (included with DJ 20GB)
-
"Windows Services for Unix" DVD case (any DVD case should do)
-
Big piece of Styrofoam from microwave oven packaging
-
Hook-and-loop fastener tape
-
Mounting tape
Tools list:
-
Dull utility knife (a sharp one would have been much better)
-
Scissors, steak knife, hacksaw
-
Philips-head screwdriver
-
Pliers

Steps:
-
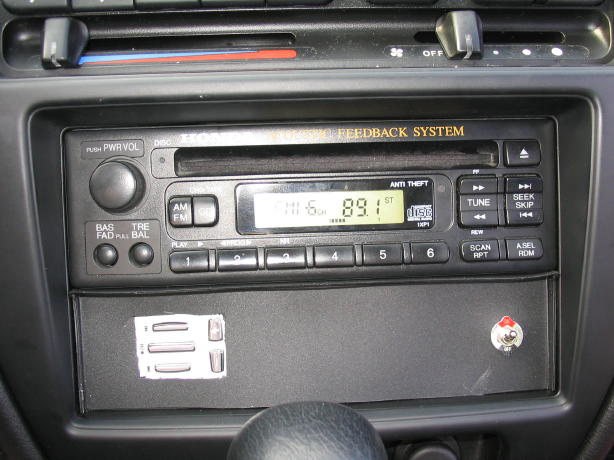
Disconnect the negative terminal of the car battery. Remove the factory stereo. The frame that holds the stereo also holds a "tray" below the stereo. I think the tray is a place-holder for additional factory accessories. It seemed like the perfect location to mount my DJ controls.
-
As luck would have it, the "Windows Services for Unix" DVD case that was handed out at TechEd is the exact width of the space previously occupied by the tray. I would use this as the "panel" for my controls. I measured out the appropriate height needed to cover the space and cut down the DVD case. I made sure to leave the "spine" of the DVD case on one end. This would prove useful, as it would allow me to mount the panel recessed into the stereo frame.
-
I cut out a square hole in the panel just big enough so the inline remote buttons would show through. On the opposite end of the panel, I poked a hole through to mount the on/off switch that comes with the FM Modulator. (When the modulator is ON, the signal is cut off from your car antennae, reducing the interference).
-
The panel was pretty flimsy (remember, it was cut from a free DVD case), so I decided to use a block of Styrofoam for reinforcement. I cut the block to be slightly smaller (width and height) than the panel. I then carved out a "mold" of the inline remote and its two wires (IN and OUT) into the block. I also created a hole through the depth of the block so that the wires from the remote could come out the other side. When the carving was done, I was able to set the remote in the Styrofoam block so that it was flush with the block's surface, and run it's wires through to the back. I then used the mounting tape to attach the black panel to the Styrofoam block, so the inline remote was sandwiched between them. From the front of the panel, you could only see the remote's buttons. From the other side came the remote's wires. The on/off switch for the modulator was screwed into the panel right next to the Styrofoam block (it is not IN the block like the remote).
-
The rest was easy. I mounted the FM Modulator to the inner wall of the console, right next to the "cigarette lighter" accessory plug, using the hook-and-loop fastener tape. I connected the power line for the modulator to the power line of the accessory plug (no splicing, I was able to jam the modulator power wire in with the accessory plug's wire). To ground the modulator, I found a screw being used to ground something else. The car antennae plugged into the modulator, the modulator plugged into the car stereo's antennae plug, and the DJ inline remote plugged into the modulator (using the 1/8" to RCA cable). I routed the other end of the inline remote into the glove box, where the DJ will reside. As luck would have it, there is enough slack in the remote wire to allow me to pull the DJ out of the glove box while it is still attached.